Trail Blazer Does Not Launch After Installation When Port 1433 Is Blocked
For a PDF version: click here
Overview
Trail Blazer may install successfully but fail to display its launch or login screen. This can occur when an organization's network blocks outbound SQL Server connections on TCP port 1433.
Trail Blazer initially attempts to connect to: mssql.trailblz.com
By default, this connection uses TCP port 1433. If the port is blocked, the Trail Blazer launch screen may be unable to load. This issue can be resolved by updating the affected user's TrailBlazer.config file to use an alternate connection port.
Applies To
- Trail Blazer Desktop
- Windows 10
- Windows 11
- Networks that block outbound TCP port 1433
Symptoms
You may experience the following behavior:
- Trail Blazer installs successfully.
- No installation error is displayed.
- Trail Blazer does not open after installation.
- The Trail Blazer launch or login screen does not appear.
- Reinstating Trail Blazer does not resolve the problem.
Cause
The Trail Blazer launch screen attempts to connect to mssql.trailblz.com over default TCP port 1433. Many organizations block this port as part of their network security policies. If Trail Blazer cannot establish the required connection, the launch screen will be unable to render.
Resolution
Update the DBPort setting in the TrailBlazer.config file associated with the affected user's Windows profile.
You must also confirm that the DBName setting contains the exact database name assigned to your organization. Database names are customer-specific and should be obtained from Trail Blazer Support or your organization's Trail Blazer administrator.
Available Alternate Ports
Try the alternate ports in the following order:
- 554
- 5356
- 51433
Note: Begin with port 554. Use another port from the list only if Trail Blazer still fails to launch.
Before You Begin
- Identify the exact Windows user account that will run Trail Blazer.
- Completely close Trail Blazer for the affected user.
- Obtain the correct database name from Trail Blazer Support or your administrator.
- Confirm that you have permission to modify files within the affected user's Windows profile.
- Use Notepad or another plain-text editor. Do not use Microsoft Word.
The configuration file is stored separately within each Windows user profile. The file that must be updated is the one located in the profile of the user who will run Trail Blazer.
It is not necessary to sign in to Windows as that user. An administrator or support technician may update the file from another account, provided they have access to the affected user's profile directory.
General File Location:
<USER PROFILE PATH>\AppData\Local\TrailBlazer\TrailBlazer.config
For a standard Windows profile, this will usually resemble:
C:\Users\<WindowsUser>\AppData\Local\TrailBlazer\TrailBlazer.config
When signed in as the affected user, the same file can be referenced via environment variables:
%LOCALAPPDATA%\TrailBlazer\TrailBlazer.config
or:
%USERPROFILE%\AppData\Local\TrailBlazer\TrailBlazer.config
Important: %LOCALAPPDATA% and %USERPROFILE% refer to the account currently running the command or application. If an administrator is working from a different account, these variables will point to the administrator's profile rather than the affected user's profile.
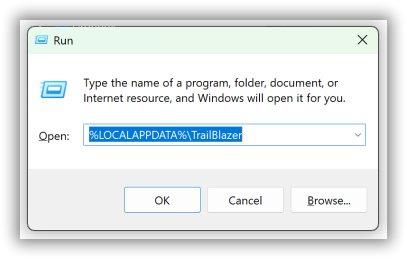
Option 1: Update the Configuration Manually
Step 1: Open the Correct Trail Blazer Configuration Folder
Use the method below that applies to your current situation:
Method A: You Are Signed In as the Affected User
- Press Windows Key + R to open the Run dialog.
- Enter:
%LOCALAPPDATA%\TrailBlazer - Select OK or press Enter.
Method B: You Are an Administrator Working from Another Account
- Open File Explorer and navigate to the affected user's profile:
C:\Users\<WindowsUser>\AppData\Local\TrailBlazer
(Replace <WindowsUser> with the folder name of the Windows account that will run Trail Blazer. For example: C:\Users\jsmith\AppData\Local\TrailBlazer)
Note: The AppData folder is hidden by default. You can enter the complete path directly into the File Explorer address bar to access it. If Windows is installed on a drive other than C:\, use the actual system path.
Step 2: Create a Backup
Before editing the file, create a backup copy:
- Right-click
TrailBlazer.config. - Select Copy.
- Right-click an empty area in the folder and select Paste.
- Rename the copied file to:
TrailBlazer.config.backup
Step 3: Open the Configuration File
- Right-click
TrailBlazer.config and select Open with > Notepad. - Do not open or save the file with Microsoft Word.
Step 4: Locate the Connection Settings
Find the following XML block within the file:
<DBSource>mssql.trailblz.com</DBSource><DBPort>1433</DBPort><DBName>DATABASE_NAME_PROVIDED_BY_TRAIL_BLAZER</DBName>
Note: The actual database name may already appear between the DBName tags.
Step 5: Update the Port and Database Name
- Change the DBPort value from
1433 to 554. - Confirm that DBName contains the exact database name provided by Trail Blazer Support.
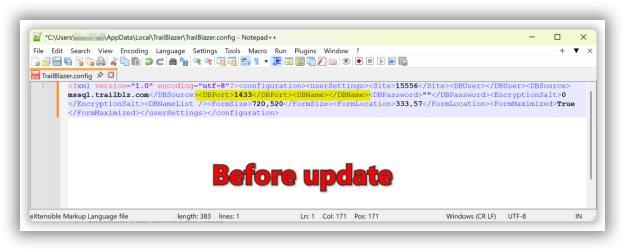
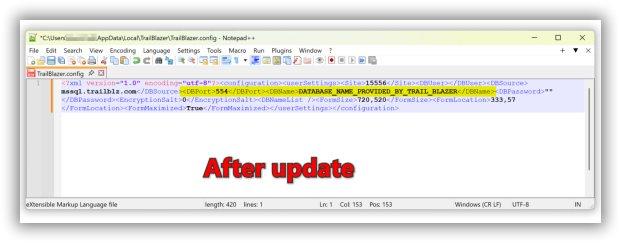
The updated configuration entries should resemble the following:
<DBSource>mssql.trailblz.com</DBSource><DBPort>554</DBPort><DBName>YourActualDatabaseName</DBName>
Important: Replace DATABASE_NAME_PROVIDED_BY_TRAIL_BLAZER with the real database name assigned to your organization. Do not include placeholder text. Do not change the DBSource value unless specifically instructed by Trail Blazer Support.
Step 6: Save the File
- In Notepad, select File > Save.
- Confirm that the file remains named exactly
TrailBlazer.config and was not saved as a text file (e.g., TrailBlazer.config.txt).
Step 7: Test Trail Blazer
Have the affected user launch Trail Blazer normally. A successful configuration will cause the login screen to appear and prompt for a username and password.
Note: The appearance of the login screen confirms that Trail Blazer can successfully communicate through the alternate port. It does not confirm that the credentials entered are valid yet.
If Port 554 Does Not Work
Close Trail Blazer completely and repeat the procedure using the next available alternate ports one at a time:
- Try:
<DBPort>5356</DBPort> - If that also fails, try:
<DBPort>51433</DBPort>
Only one port should be entered in the configuration file at a time.
Advanced Option: Update the Configuration with PowerShell
Advanced users and IT administrators can update the configuration file efficiently with a PowerShell script. This script:
- Updates the configuration for the Windows account under which the script is executed.
- Creates a timestamped backup copy before making changes.
- Updates only the
DBPort and DBName settings. - Verifies both settings exist before saving.
- Automatically restores the backup if the update fails.
- Is compatible with Windows PowerShell 5.1.
Important: User Context
The script targets the $env:LOCALAPPDATA environment variable, which points directly to the profile of the account running the PowerShell session. Therefore, the script must be run under the Windows account that will use Trail Blazer. It does not require administrative privileges under normal conditions.
Do not use "Run as different user" with an unrelated administrator account, or it will modify the administrator's profile instead of the user's profile.
PowerShell Script
Save the following code block exactly as Update-TrailBlazerConfig.ps1:
#requires -Version 5.1<#.SYNOPSISUpdates the Trail Blazer database port and database name for theWindows account under which the script is run..DESCRIPTIONLocates TrailBlazer.config in the current account's Local AppDatafolder, creates a timestamped backup, and updates the DBPort andDBName XML settings.Run this script under the Windows account that will use Trail Blazer.#>[CmdletBinding()]param ( [Parameter(Mandatory = $true)] [ValidateNotNullOrEmpty()] [string]$DBName, [Parameter()] [ValidateSet('554', '5356', '51433')] [string]$DBPort = '554')$ConfigPath = Join-Path $env:LOCALAPPDATA 'TrailBlazer\TrailBlazer.config'if (-not (Test-Path -LiteralPath $ConfigPath -PathType Leaf)) { throw "The Trail Blazer configuration file was not found: $ConfigPath"}$Timestamp = Get-Date -Format 'yyyyMMdd-HHmmss'$BackupPath = "$ConfigPath.$Timestamp.bak"Copy-Item -LiteralPath $ConfigPath -Destination $BackupPath -Force -ErrorAction Stoptry { [xml]$ConfigXml = Get-Content -LiteralPath $ConfigPath -Raw -ErrorAction Stop $DBPortNode = $ConfigXml.SelectSingleNode('/configuration/userSettings/DBPort') $DBNameNode = $ConfigXml.SelectSingleNode('/configuration/userSettings/DBName') if ($null -eq $DBPortNode) { throw 'The DBPort setting was not found in the configuration file.' } if ($null -eq $DBNameNode) { throw 'The DBName setting was not found in the configuration file.' } $OldDBPort = $DBPortNode.InnerText $OldDBName = $DBNameNode.InnerText $DBPortNode.InnerText = $DBPort $DBNameNode.InnerText = $DBName $Encoding = New-Object System.Text.UTF8Encoding($false) $WriterSettings = New-Object System.Xml.XmlWriterSettings $WriterSettings.Encoding = $Encoding $WriterSettings.Indent = $false $WriterSettings.OmitXmlDeclaration = $false $Writer = [System.Xml.XmlWriter]::Create($ConfigPath, $WriterSettings) try { $ConfigXml.Save($Writer) } finally { $Writer.Dispose() } Write-Host '' Write-Host 'Trail Blazer configuration updated successfully.' -ForegroundColor Green Write-Host "Configuration file: $ConfigPath" Write-Host "DBPort: $OldDBPort -> $DBPort" Write-Host "DBName: $OldDBName -> $DBName" Write-Host "Backup: $BackupPath"}catch { Copy-Item -LiteralPath $BackupPath -Destination $ConfigPath -Force -ErrorAction SilentlyContinue throw "The configuration could not be updated. The original file was restored. $($_.Exception.Message)"}
Running the Script
Under the Windows account that will use Trail Blazer:
- Close Trail Blazer.
- Open Windows PowerShell.
- Change directories (cd) to the folder containing the script.
- Execute the script using the following command framework:
Set-ExecutionPolicy -Scope Process -ExecutionPolicy Bypass -Force.\Update-TrailBlazerConfig.ps1 -DBName 'YOUR_ORGANIZATION_DATABASE_NAME' -DBPort '554'
Optional: Test an Alternate Port Directly
An IT administrator can test whether a workstation can physically reach our database servers via an alternate port before changing any configuration files. This connectivity test is computer/network specific, not profile specific.
Open Windows PowerShell and execute the following command:
Test-NetConnection -ComputerName 'mssql.trailblz.com' -Port 554
Review the results output in the terminal window. Look explicitly for the line:
TcpTestSucceeded : True
A value of True indicates outbound traffic through that port is clear. To check other ports, swap 554 for 5356 or 51433.
Troubleshooting
The TrailBlazer Folder Does Not Exist
- Confirm you are checking the profile path of the specific Windows account designated to run the software.
- Verify Trail Blazer was installed and initialized on that specific profile by opening it at least once.
- Check for manual path errors. For a user profile, use
%LOCALAPPDATA%\TrailBlazer.
The Configuration File Cannot Be Found
- Confirm the file is explicitly named
TrailBlazer.config. - Ensure Windows "Hide known file extensions" didn't accidentally save it as
TrailBlazer.config.txt.
Access Is Denied When Opening or Saving the File
- Ensure Trail Blazer is completely closed down on the target profile.
- Confirm the executing user account has full read/write directory permissions or that endpoint security/antivirus software isn't locking modifications down.
Trail Blazer Still Does Not Launch
- Re-verify that you edited the file in the correct profile directory.
- Confirm values for
DBPort and DBName saved correctly without placeholder text. - Verify
DBSource is still set exactly to mssql.trailblz.com. - Cycle and test alternate ports
5356 or 51433. - Restart Windows and test launching the app once more.
All Alternate Ports Fail
If all connection attempts return false, the organization's network perimeter firewall or routing policies are completely blocking outbound traffic to mssql.trailblz.com. Your IT department must explicitly whitelist outbound TCP traffic to at least one of our connection ports (554, 5356, or 51433).
The Login Screen Appears but Login Fails
If the login dialog loads, your port connectivity issue is resolved! Credentials errors are unrelated to network ports. Double-check your user login details or contact Trail Blazer Support for a credential reset.
Restore the Previous Configuration
Always close Trail Blazer before restoring file backups.
Navigate back to the configuration folder: <USER PROFILE PATH>\AppData\Local\TrailBlazer
If Updated Manually:
- Delete or rename the failed
TrailBlazer.config file. - Rename your backup file from
TrailBlazer.config.backup back to TrailBlazer.config.
If Updated via PowerShell:
Locate the timestamped backup file (e.g., TrailBlazer.config.20260714-103000.bak). Copy this file over the broken configuration file and rename it exactly to TrailBlazer.config.
Information to Provide to Trail Blazer Support
If technical assistance is still required, please gather and send the following details to our support team:
- Windows Operating System Version
- Trail Blazer Software Version
- Your Assigned Organization Database Name
- The full directory path of the configuration file modified
- The specific ports tested
- The full command output from the
Test-NetConnection commands - Whether the login screen successfully appeared during any step
- Any specific error messages or error codes thrown
- Whether updates were processed manually or via the PowerShell script
?? For system security, never send account passwords through unencrypted or unsecure emails.